Object Detection at 2530 FPS with TensorRT and 8-Bit Quantization
December 31, 2020
Intro #
My previous post Object Detection at 1840 FPS made some readers wonder who would need to detect anything at 1840 FPS, but my good friend and “performance geek” Tanel Põder had a different response:
Nice article, I wonder if you could get to 2000 FPS?
Challenge accepted.
This article is a deep dive into the techniques needed to get there. We will rewrite Pytorch model code, perform ONNX graph surgery, optimize a TensorRT plugin and finally we’ll quantize the model to bits (to 8 bit precision, that is). We will also keep track of divergence from full-precision accuracy with the COCO2017 validation dataset.
Code supporting this article can be found here: github.com/pbridger/tensorrt-ssd300-8bit-quantized.
A quick preview of the final results:
So how do we get to 2000 FPS? My previous post already brought the big guns — a TensorRT-optimized DeepStream pipeline was needed to hit 1840 FPS running on 2x Nvidia 2080Ti cards. This time we will abandon TorchScript and DeepStream, and we’ll put in the work to fully embrace TensorRT model compilation and execution.
On Optimizing Arbitrary Numbers #
1840 FPS, 2000 FPS, 2530 FPS — there is nothing special about any of these numbers, they are all hardware, resolution and model dependent. These optimization articles are about the practical usage of cutting-edge tools and techniques to achieve ambitious project goals or unlock cost savings.
Tuning a pipeline for throughput maximizes hardware utilization and efficiency in the datacenter, and it allows us to deploy larger models or more complex systems in compute-limited contexts (think IoT, embedded and mobile). It’s also just fun to explore the limits of powerful tools!
Let’s get started with a baseline from the previous article.
Stage 0: DeepStream Baseline #
To recap, we got peak throughput with the DeepStream pipeline by using a hybrid model — a TensorRT-optimized SSD300 front-end with postprocessing code running in TorchScript in the libtorch runtime. All processing on GPU, of course. Here’s a reminder of some of the throughput milestones from the last article:
Why did we need TorchScript? Several common object-detection postprocessing operations — including thresholding and non-max-suppression (NMS) — can’t be seamlessly exported from Pytorch to ONNX and compiled with TensorRT. Leaving these operations in TorchScript allowed us to get great performance without rewriting any model code or creating TensorRT plugins.
Looking at the performance trace from Nsight Systems, we can see the TorchScript postprocessing comes in just under 10 ms. When we compiled the inference step with TensorRT we saw around 43 ms of TorchScript turn into about 16 ms equivalent processing — so anything executing in TorchScript seems ripe for optimization.
Here’s what it looked like in Nsight Systems:
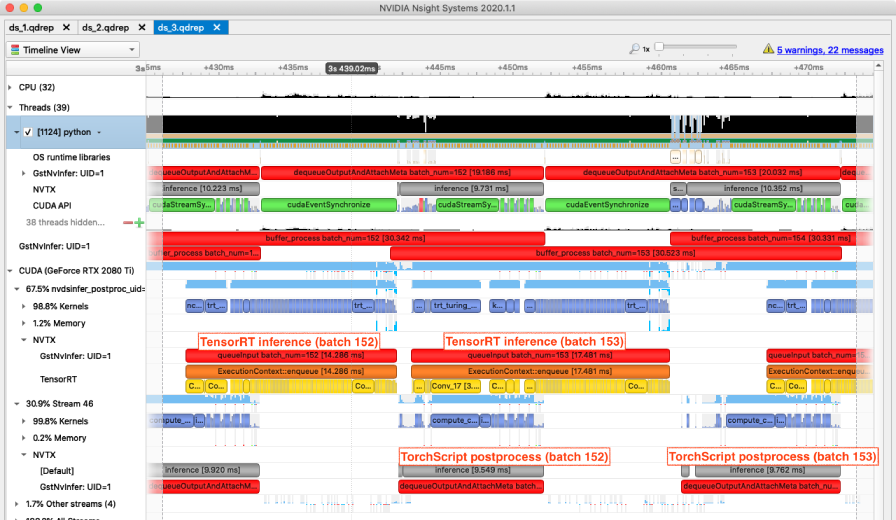
Let’s eliminate the TorchScript postprocessing and get the entire model running end-to-end in TensorRT.
Stage 1: End-to-End TensorRT #
The baseline Pytorch SSD300 model (including postprocessing) cannot be easily compiled with TensorRT for several reasons, all of which involve missing (or impossible) support for tensor operations:
-
Subscripted tensor assignment results in
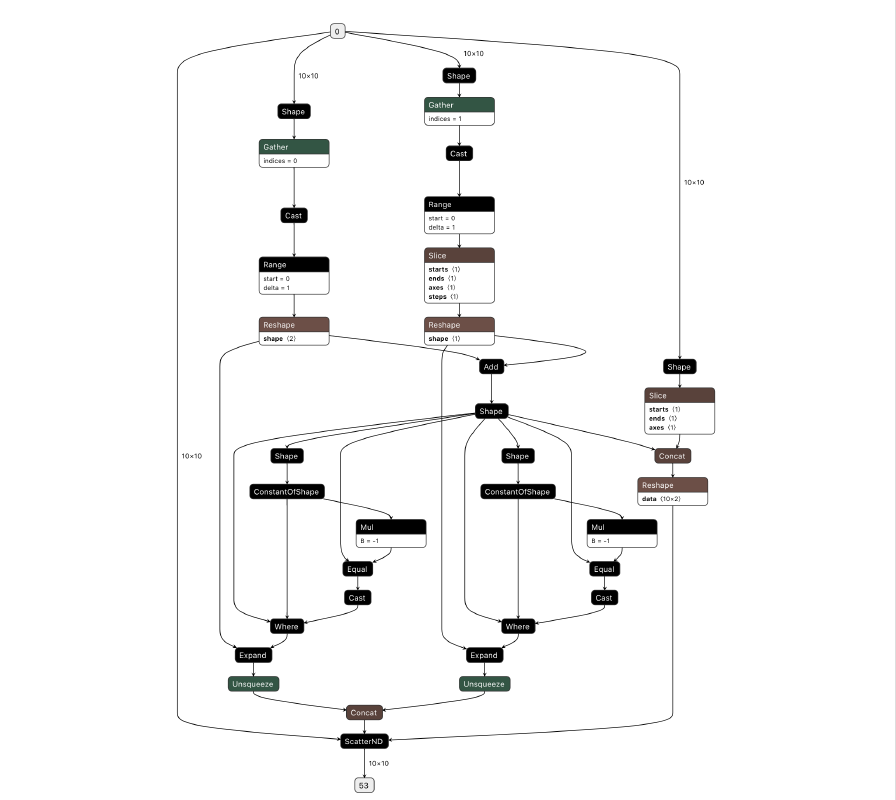
ScatterND(indexed assignment) nodes in ONNX. -
Score thresholding uses a mask operation, which cannot be expressed in the fixed-dimension world of TensorRT.
-
Torchvision’s batched non-max suppression (NMS) operation has no exact equivalent in TensorRT.
We can fix the first by tweaking model code and re-exporting to ONNX, but to fix the other issues we’ll have to modify the ONNX computational graph — replacing these operations with a TensorRT plugin.
1.1 Rewriting Subscripted Tensor Assignment #
The baseline postprocessing contains some bounding-box rescaling code:
        bboxes_batch[:, :, :2] = self.scale_xy * bboxes_batch[:, :, :2]
        bboxes_batch[:, :, 2:] = self.scale_wh * bboxes_batch[:, :, 2:]

        bboxes_batch[:, :, :2] = bboxes_batch[:, :, :2] * self.dboxes_xywh[:, :, 2:] + self.dboxes_xywh[:, :, :2]
        bboxes_batch[:, :, 2:] = bboxes_batch[:, :, 2:].exp() * self.dboxes_xywh[:, :, 2:]

        # transform format to ltrb
        l, t, r, b = bboxes_batch[:, :, 0] - 0.5 * bboxes_batch[:, :, 2],\
                     bboxes_batch[:, :, 1] - 0.5 * bboxes_batch[:, :, 3],\
                     bboxes_batch[:, :, 0] + 0.5 * bboxes_batch[:, :, 2],\
                     bboxes_batch[:, :, 1] + 0.5 * bboxes_batch[:, :, 3]

        bboxes_batch[:, :, 0] = l
        bboxes_batch[:, :, 1] = t
        bboxes_batch[:, :, 2] = r
        bboxes_batch[:, :, 3] = b
This code will export to an ONNX graph without issue, but parsing with TensorRT will result in an error: No importer registered for op: ScatterND or getPluginCreator could not find plugin ScatterND.
We can rewrite the code to avoid generating ScatterND nodes by not using subscript assignment:
    def rescale_locs(self, locs):
        locs *= self.scale_xyxywhwh

        xy = locs[:, :, :2] * self.dboxes_xywh[:, :, 2:] + self.dboxes_xywh[:, :, :2]
        wh = locs[:, :, 2:].exp() * self.dboxes_xywh[:, :, 2:]

        wh_delta = torch.cat([wh, wh], dim=-1) * self.scale_wh_delta
        cxycxy = torch.cat([xy, xy], dim=-1)
Problem solved, this code exports without issue to ONNX and then TensorRT. See subscript_assignment.py in the repo for an isolated example:
    def forward(self, X):
        X[:, :2] = 0
        return X
[TensorRT] WARNING: /build/TensorRT/parsers/onnx/onnx2trt_utils.cpp:220: Your ONNX model has been generated with INT64 weights, while TensorRT does not natively support INT64. Attempting to cast down to INT32.
[TensorRT] WARNING: /build/TensorRT/parsers/onnx/onnx2trt_utils.cpp:246: One or more weights outside the range of INT32 was clamped
[TensorRT] ERROR: INVALID_ARGUMENT: getPluginCreator could not find plugin ScatterND version 1
exporting SubscriptAssign to models/subscript_assign.onnx
compiling models/subscript_assign.onnx with TensorRT
1.2 TensorRT and Masking #
Masking is essential to efficient SSD postprocessing. It needs to be done before calculating NMS because of the large number of possible detection bounding boxes (over 8000 for each of 81 classes for this model). Without first reducing the candidate boxes the NMS calculation would be hugely expensive.
However, TensorRT compilation depends on tensor dimensions being known at compile time. TensorRT layer output dimensions are allowed to vary based on input dimensions, but not based on the result of the layer calculation itself. Unfortunately, this is exactly what supporting masking in TensorRT would require.
Masking in Pytorch will result in NonZero ONNX nodes which cannot be expressed as a TensorRT layer or plugin. TensorRT fails with No importer registered for op: NonZero. or getPluginCreator could not find plugin NonZero. See masking.py in the repo for an example:
    def forward(self, X):
        X = X[X.sum(dim=-1) > 0]
        return X
[TensorRT] ERROR: INVALID_ARGUMENT: getPluginCreator could not find plugin NonZero version 1
/opt/conda/lib/python3.6/site-packages/torch/onnx/symbolic_opset9.py:2329: UserWarning: Exporting aten::index operator with indices of type Byte. Only 1-D indices are supported. In any other case, this will produce an incorrect ONNX graph.
  warnings.warn("Exporting aten::index operator with indices of type Byte. "
/opt/conda/lib/python3.6/site-packages/torch/onnx/symbolic_opset9.py:591: UserWarning: This model contains a squeeze operation on dimension 1 on an input with unknown shape. Note that if the size of dimension 1 of the input is not 1, the ONNX model will return an error. Opset version 11 supports squeezing on non-singleton dimensions, it is recommended to export this model using opset version 11 or higher.
  "version 11 or higher.")
exporting Masking to models/masking.onnx
compiling models/masking.onnx with TensorRT
One solution here would be to replace a probability-threshold mask with a top-k approach, which results in an output with fixed dimensions and can therefore be executed in TensorRT. However because we need both top-k and NMS to complete model postprocessing, there is a better alternative.
1.3 Replacing Masking and NMS with batchedNMSPlugin
#
TensorRT ships with a set of open source plugins that extend the functionality of the core layers. One such layer (batchedNMSPlugin) does almost exactly what we need: NMS on some top-k detections.
So how do we use it? We will have to go beyond the simple Pytorch -> ONNX -> TensorRT export pipeline and start modifying the ONNX, inserting a node corresponding to the batchedNMSPlugin plugin and cutting out the redundant parts.
A library called ONNX GraphSurgeon makes manipulating the ONNX graph easy, all we need to do is figure out where to insert the new node. This is the full postprocessing computational graph (not including all the convolutions):
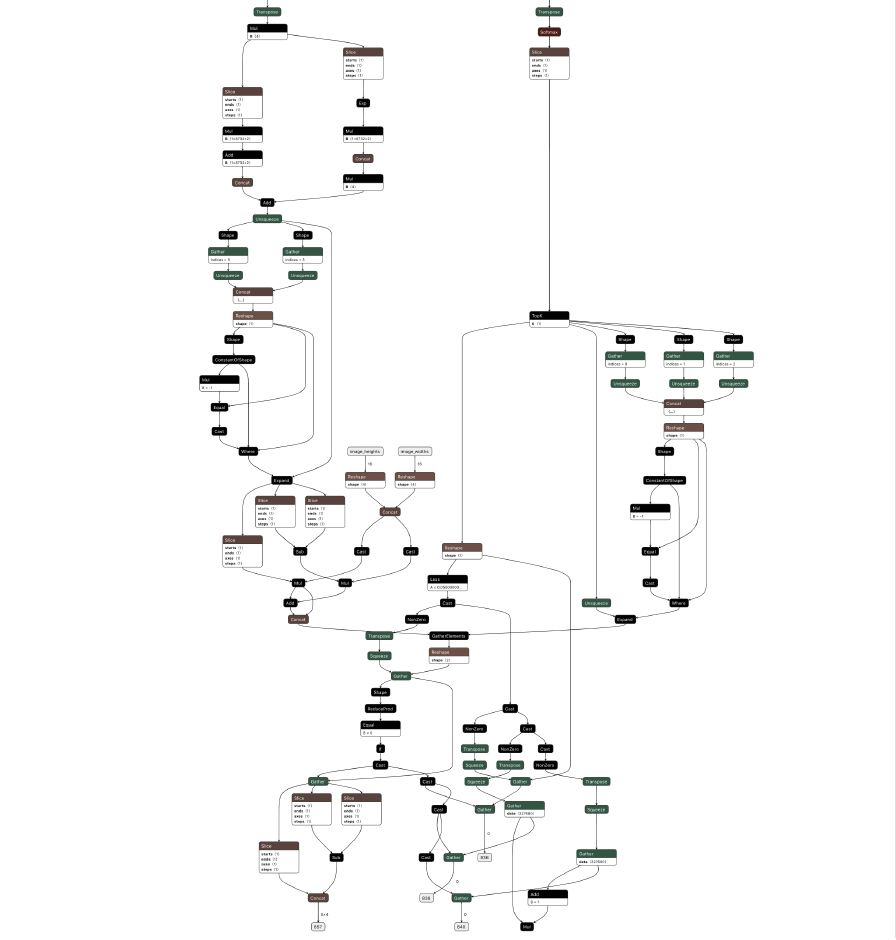
There are two ways to figure out where to insert the batchedNMSPlugin:
-
The hard way is to stare at the ONNX representation above, map it back to Pytorch code and figure out which tensors are the correct inputs to the plugin. Be my guest.
-
The easy way is to tweak the Pytorch model code to produce exactly the outputs the plugin will need. These are then easily accessible in the ONNX graph as outputs, and can be plugged into a new
batchedNMSPluginnode as inputs.
See the build_onnx function to review how I did it (the easy way). The resulting modified ONNX looks like this:
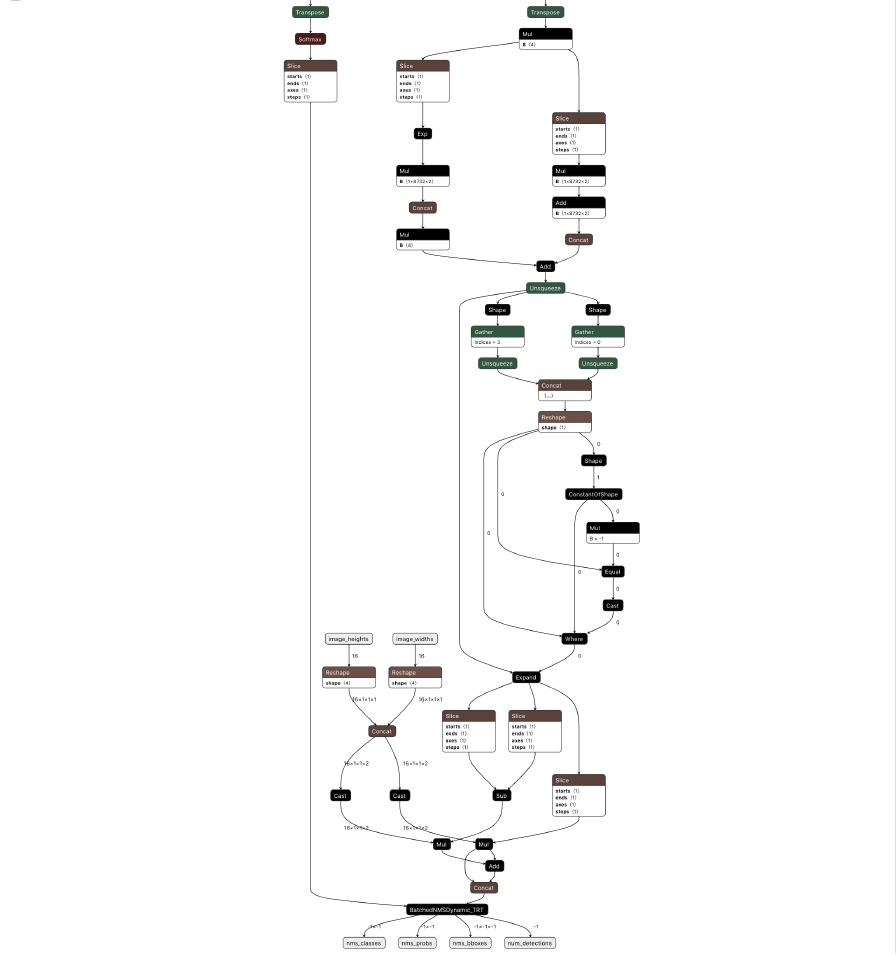
This looks a lot simpler, but more importantly this ONNX can be compiled and optimized end-to-end with TensorRT. See the build_trt_engine function for details.
1.4 Results and Analysis #
Compiling the modified ONNX graph and running using 4 CUDA streams gives 275 FPS throughput. With float16 optimizations enabled (just like the DeepStream model) we hit 805 FPS.
Mean average precision (IoU=0.5:0.95) on COCO2017 has dropped a tiny amount from 25.04 with thefloat32baseline to 25.02 withfloat16.
805 FPS is less than the directly comparable model running in DeepStream (at 920 FPS). Let’s dig into an Nsight Systems profile (ssd300.fp16.b16.k256.trt.legacy.qdrep) for the end-to-end model and understand where the time is being spent. The following trace was collected with a single CUDA stream for clarity, and is zoomed in to show a single 16-image batch:
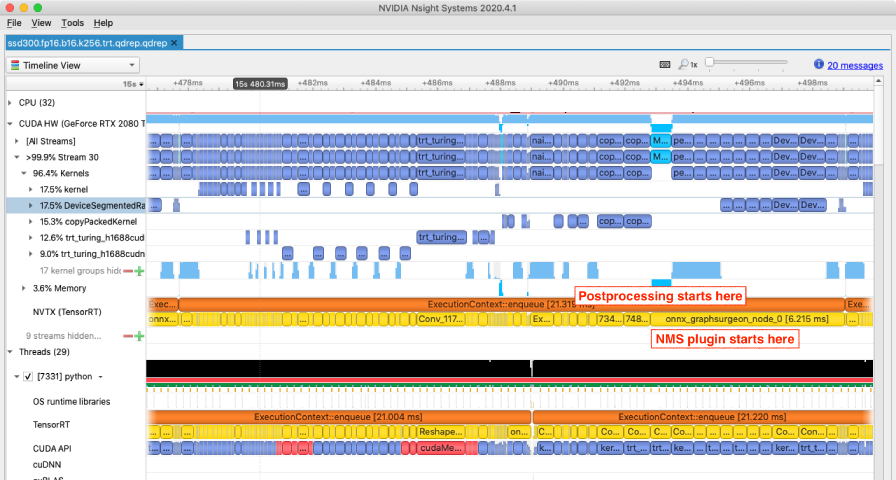
I’ve marked the beginning of postprocessing (after cross-referencing executed kernels with the DeepStream model), and also marked the execution of the Top-k/NMS plugin.
Referring back to the DeepStream execution profile, the postprocessing in the end-to-end TensorRT model is immediately suspect. In the DeepStream pipeline, postprocessing was taking 9-10 ms in TorchScript while interleaved with other computation, and here we see around 10 ms of postprocessing but with no concurrent computation.
Digging into the code of the Top-k/NMS plugin we can see it only supports float32 computation, and therefore is not using the tensor cores. :(
If you’ve spent days rewriting model code, performing ONNX surgery, and integrating a TensorRT plugin, and now the model runs slower — you might find yourself thinking “Fork TensorRT.” So let’s do it, let’s fork TensorRT. If we extend this plugin to support float16 computation we can expect to see some nice gains.
Stage 2: Forking TensorRT #
If you look at Nvidia’s TensorRT repository you’ll see we’re not really forking the compiler, just the open-source plugins and tools that come with the framework. We’re also not writing any new kernels, just porting the batchedNMSPlugin to work with float16 — any float32 logic that is implemented in terms of CUB or Thrust (Nvidia’s CUDA algorithm libraries) should be straightforward to port to float16.
The repository is here: github.com/pbridger/TensorRT.
If you look at the diff for adding float16 support to batchedNMSPlugin you’ll mostly see updated TensorRT plugin boilerplate, some template specializations and some casts to full-precision float. The casts from __half (float16) to float (float32) mean that some of the plugin computation remains at high precision, notably the bounding-box calculations. This is due to strategic laziness — looking at a profile of the original float32 batchedNMSPlugin execution makes the decision clear:
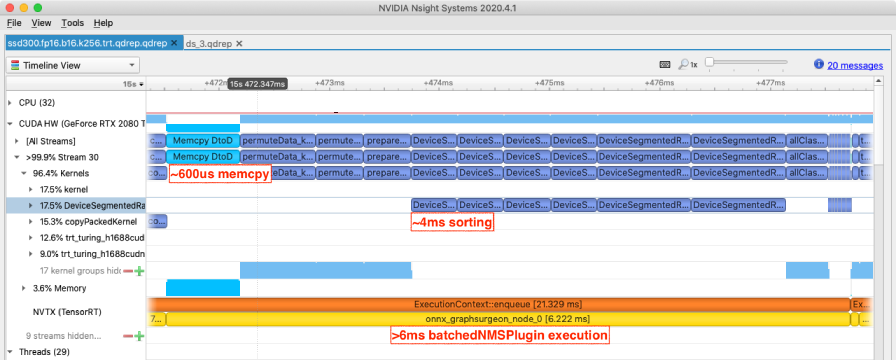
The float32 batchedNMSPlugin takes 6.2 ms to execute and the largest chunk of that time is sorting. Those DeviceSegmentedRadixSort kernels are calls to CUB and are implemented by Nvidia for float16 as well as float32. Now let’s compare the profile of the updated float16 version of batchedNMSPlugin:
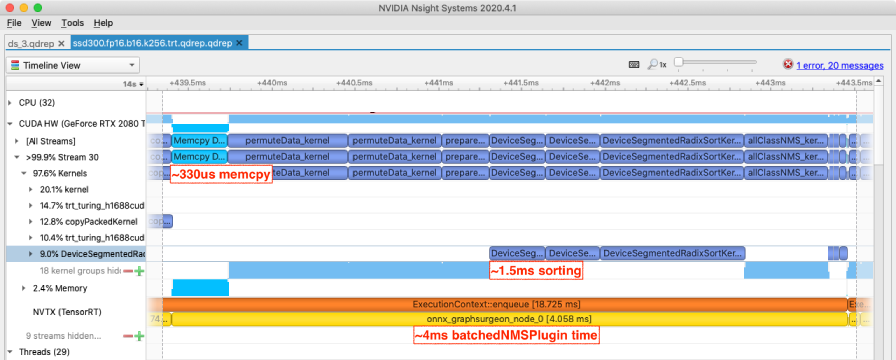
We’ve saved a whole 2+ ms with the low-effort plugin port, and all it took was a few confident hacks followed by hours and hours of debugging numerical issues in CUDA code. Perfect. Also note the reduced memory-copy time — a sometimes under-appreciated benefit of computation at lower precision is having less data to copy and overall lower memory overheads.
Let’s see what that has done to the throughput:
940 FPS, great, we are finally beating the DeepStream hybrid TensorRT/TorchScript model. We are also getting close to our target single-GPU throughput of 1000 FPS, but we are not there yet.
I’m running this model on 2080Ti GPUs, and the Turing architecture tensor cores should give up to 2X throughput when doing int8 computations (compared to float16). Let’s try that.
Stage 3: 8-Bit Quantization 👾 #
There are a few ways to do 8-bit quantization, and choosing between them is a trade-off between several factors including dev effort and model accuracy. If you are training your own models then Pytorch’s quantization aware training will give you output closest to the full-precision model. However, at the time of writing Pytorch (1.7) only supports int8 operators for CPU execution, not for GPUs. Totally boring, and useless for our purposes.
Luckily TensorRT does post-training int8 quantization with just a few lines of code — perfect for working with pretrained models. The only non-trivial part is writing the calibrator interface — this feeds sample network inputs to TensorRT, which it uses to figure out the best scaling factors for converting between floating point and int8 values. The code below sends the preprocessed COCO validation set to TensorRT for calibration:
Int8 Calibrator
class Int8Calibrator(trt.IInt8EntropyCalibrator2):
    def __init__(self, args):
        super().__init__()
        self.batch_dim = args.batch_dim
        self.dataloader = iter(get_val_dataloader(args))
        self.current_batch = None # for ref-counting
        self.cache_path = 'calibration.cache'

    def get_batch_size(self):
        return self.batch_dim

    def get_batch(self, tensor_names):
        # assume same order as in dataset
        try:
            tensor_nchw, _, heights_widths, _, r_e = next(self.dataloader)
            self.current_batch = tensor_nchw.cuda(), heights_widths[0].cuda(), heights_widths[1].cuda()
            return [t.data_ptr() for t in self.current_batch]
        except StopIteration:
            return None

    def read_calibration_cache(self):
        if os.path.exists(self.cache_path):
            with open(self.cache_path, 'rb') as f:
                return f.read()

    def write_calibration_cache(self, cache):
        with open(self.cache_path, 'wb') as f:
            f.write(cache)
The calibration process takes notably longer than float32/float16 compilation, but the results are gratifying:
Note the chart scale change from 2000 to 3000 FPS, even this chart cannot keep up with our optimizations.
We’re now hitting 1240 FPS on a single 2080Ti (up from 940 FPS) and 2530 FPS running concurrently on two GPUs. Not only have we crushed our clickbait target (2000 FPS), but you may notice we’ve managed to achieve the coveted greater than 100% scalability. 2x1240 = 2480, so we’ve magically gained an extra 50 FPS running with two GPUs.
The truth is less exciting. I consistently get better performance on GPU-1 than GPU-0, but I’ve been reporting single-GPU numbers from GPU-0 throughout the article series. Whether this is due to different thermals, different firmware, or even a different hardware revision (I needed to RMA one card) I don’t know.
Mean average precision (IoU=0.5:0.95) on COCO2017 has dropped from 25.04 with thefloat32baseline to 24.77 with theint8quantized model. This is beginning to become noticeable, but this kind of change is still dwarfed by differences between model architectures.
It’s worth digging into an Nsight Systems profile to get a sense of the impact of this 8-bit quantization. The first profile is zoomed to a 16-image batch running with the float16 model. I’ve annotated the core SSD execution time (until the first memory transfer) as 10.5 ms:
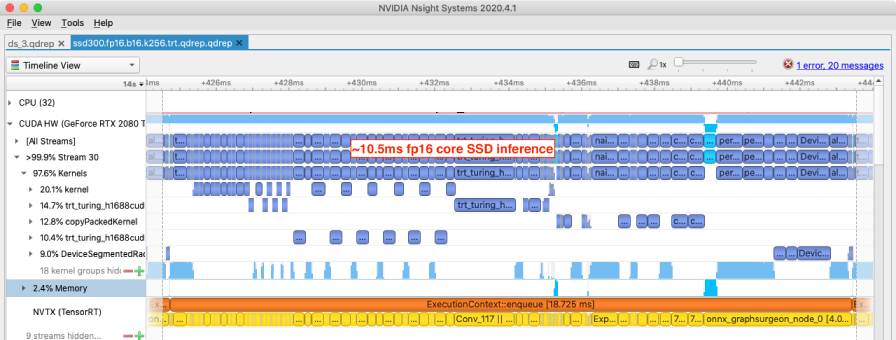
After 8-bit quantization, the corresponding core SSD computation is now 5.5 ms. It’s great to see the Turing architecture living up to the expected roughly 2X execution speed, for the basic convolutions at least:
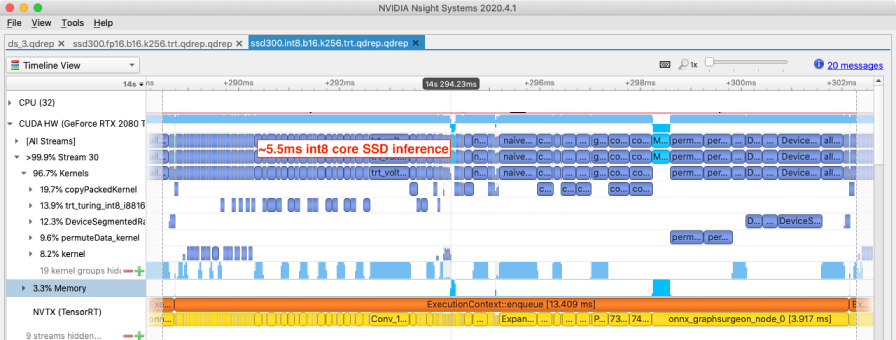
The postprocessing is running no faster than before, and is now dominating the computation. I’ll leave further quantization work as an exercise for the reader. Ping me at paul@paulbridger.com when it’s done.
Conclusion #
2530 FPS is an awesome result, but it took a substantial effort. It’s useful to know what is possible with modern GPU architectures, and it’s useful to see the discrete impact on throughput and model accuracy of various optimizations. However, most smaller development shops don’t have the resources or patience to be this obsessive.
To get these results you have to leave the simple, well-supported productionization workflows behind and solve a lot of gnarly issues (many not mentioned above). This post is as much evidence that truly high-performance productionization workflows aren’t “there yet” as it is of the capabilities of cutting-edge tools.
This is the last article in my SSD300 object-detection optimization series. In future articles I’ll get deep into the details of productionization on different hardware architectures (Nvidia Jetson and Apple Neural Engine) as well as look at more state-of-the-art models (EfficientDet, Yolo, and transformers).
